Often times you are required to store large amounts of call data resulting in millions of call rows in a single database. Housing large amounts of call data in a single database can be resource intensive when your day to day reporting requirements are usually only one, two or three months of call data.
Variphy 13.0 introduced the ability to support multiple databases within a single cluster. Variphy’s Auto Archiving feature provides functionality to automatically create new databases known as Active Archive databases. On a schedule basis Variphy will Automatically create an incremental Active Archive Database (Database_Archive1, Database_Archive2, etc…) and insert new data (new being data received after the Archive database was created) into the the Active Archive; repeating the process per the Automatic Archiving Schedule. Only new data will go into each incremental Active Archive database leaving the data in the old Archives available for seamless reporting. As new Archives are created each will have it respective dataset based on the time period that the archive runs. Housing less data in your Primary and Archive databases free up valuable resources for your day to day reporting but leaving the archived data available for seamless reporting when needed.
THIS ARTICLE IS INTENDED FOR VARIPHY CUSTOMERS WHO HAVE EXISTING CLUSTERS AND ARE ENABLING AUTO DATABASE ARCHIVING FOR THE FIRST TIME.
IF YOU DO NOT HAVE AN EXISTING CLUSTER OR HAVE A NEW CLUSTER WITH MINIMAL DATA THIS ARTICLE IS NOT FOR YOU. PLEASE PROCEED TO How to configure Auto Database Archiving for a new cluster.
1. Configuring Automatic Database Archiving.
- Navigate to the CDR Processing tab and edit the cluster you will configuring for Auto Archiving.
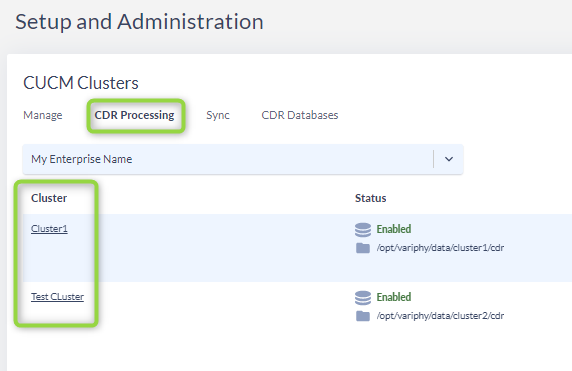
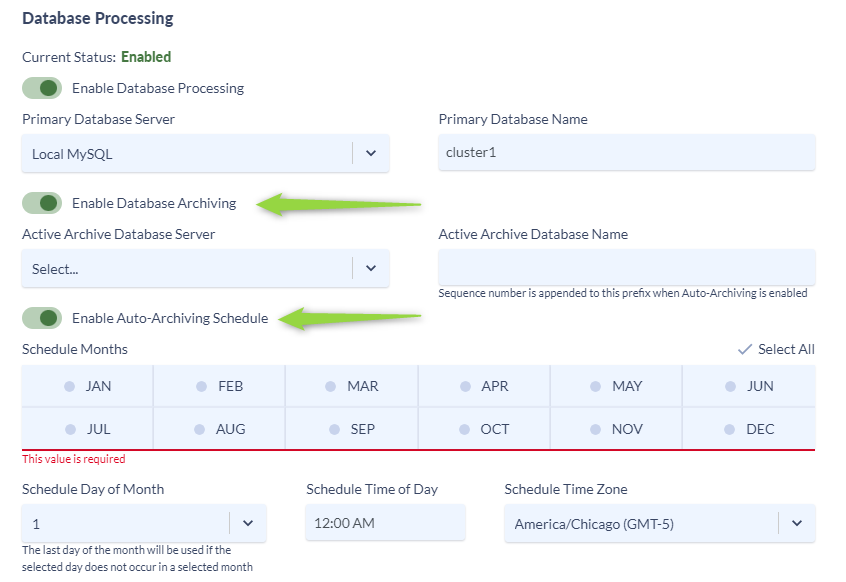
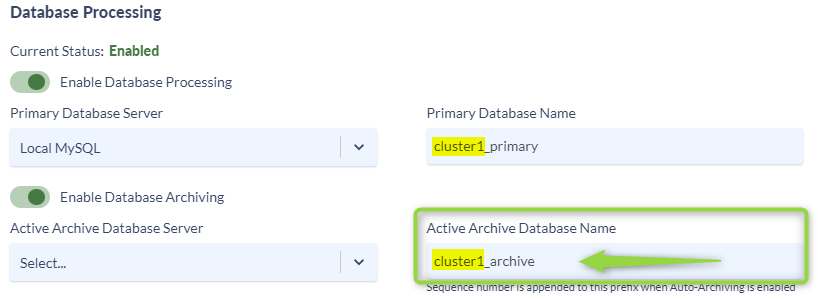
- In the CDR Processing menu navigate to the Database Processing section and toggle on Enable Database Archiving and Enable Auto-Archiving Schedule. If you do not have the “Enable Database Archiving” option please contact your Account Manager for information on how to get Automatic Database Archiving.
IT IS IMPERATIVE YOU DO NOT SKIP THE NEXT STEP. SKIPPING STEP 7 STAY MAY RESULT IN LOSS OF DATA.
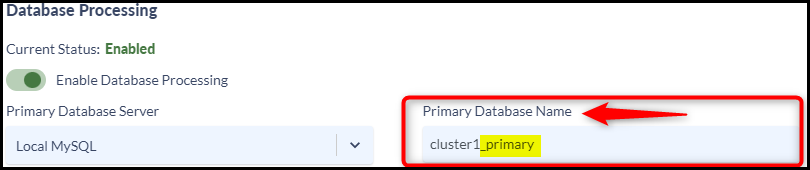
- Rename your existing Primary Database by appending _primary to the database name.
- In the Active Database Archiving section use the Active Archive Database Server drop down to select the database server that you wish your archives to be stored.
- One of the benefits of Auto Archiving is that the archive databases do not need to reside on the same server as your primary database. Keeping your Primary reporting database on one database server while your archives reside on another is recommended to help improve day to day reporting experience.

- In the Active Database Archive section give your Active Archive Database a name. For consistency it is recommended to use the same name as your original Primary Database and append “_archive”. Variphy will automatically append a sequence number to the prefix of the archives.
- In the Auto Archiving Schedule section define the schedule you want the auto archiving to run.
- Select the Months you wish the archiving to run.
- Select the day of the month and time the archive will run.
In this example I am Archiving my database every 3 month on the 15th of the month at 4:00 AM. This will result in a new Active Archive database being created every three months housing the previous 3 months of data.
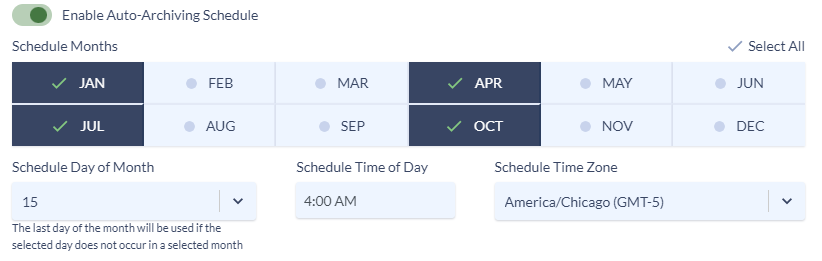
There is no single best Archiving schedule as it varies dependent on your call volume and system usage. If you have a larger volume of calls, say 5+ million a month, and you frequently need to access older data, you may want to run monthly or bi-monthly archives, keeping your archive databases smaller for faster querying. If you have a smaller call volume but require lengthy retention but rarely need to access that older data, you may want to archive quarterly keeping larger archives that are accessed less frequently.
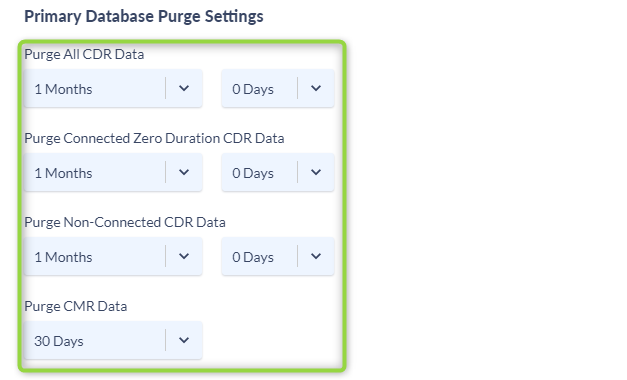
- Scroll down to the Primary Database Purge Settings and adjust your purge schedule.
- ONLY ADJUST THESE SETTINSG IF YOU HAVE COMPLETED STEP 2.7 ABOVE.
- The Primary Database Purge schedule will only purge the Primary database keeping all of the archive data intact and available for seamless reporting. The purge schedule of your primary database should reflect your common reporting requirements. For example. If you normally run Daily, Weekly & Monthly reports I would have my primary database only house 1 or 2 months of data.
- Once you have completed all of the above steps click Save and Continue.
- Click Create Database for the PRIMARY.
- Click Create Database for the ACTIVE ARCHIVE.
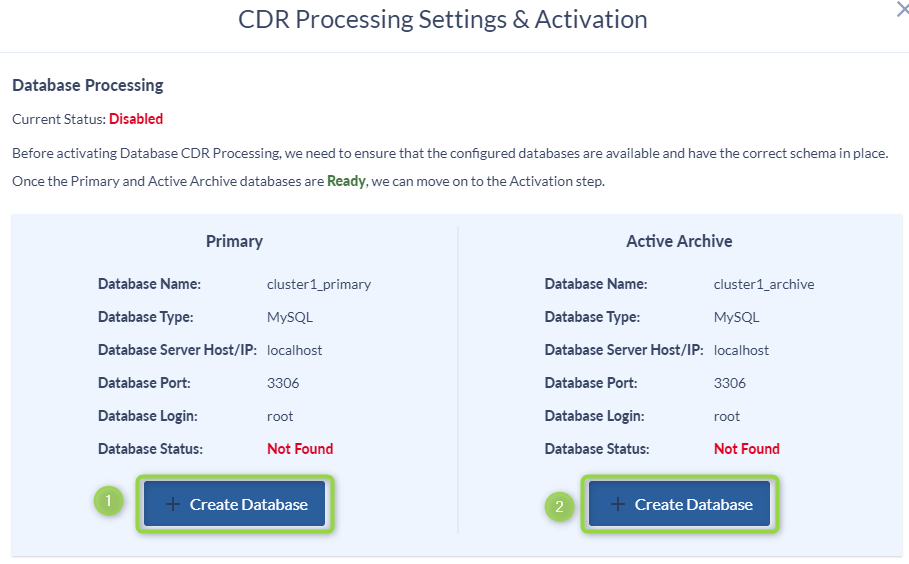
- Click Activate.
- Click Close.
2. Associate the old primary database to the cluster to allow reportability to the older data
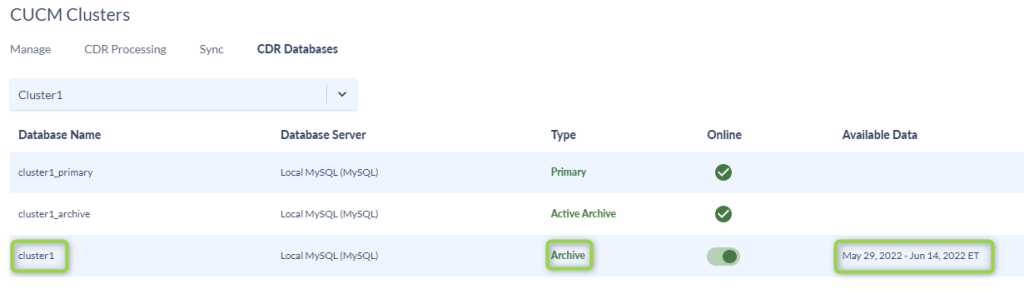
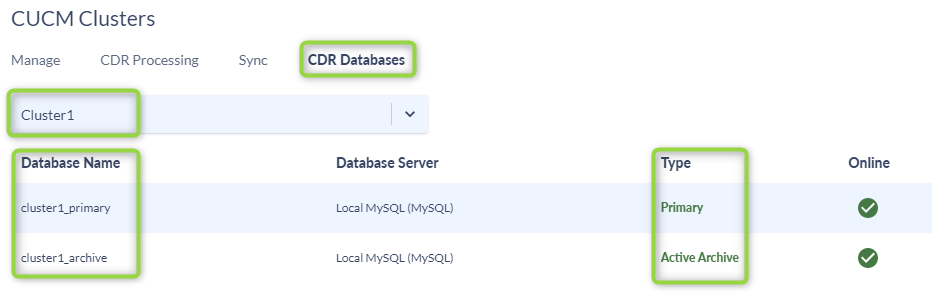
- Navigate to the CDR Databases tab and using the drop down select the cluster you configured for archiving.
- You should now see two databases a Primary and Active Archive with little to no call data.
- Click the Associate Existing Archive button on the right side of the screen.

- Select the Database server from the drop down
- Select the Database that you are associating to the cluster.
- This will be the previous Primary Database that you renamed to “_primary“
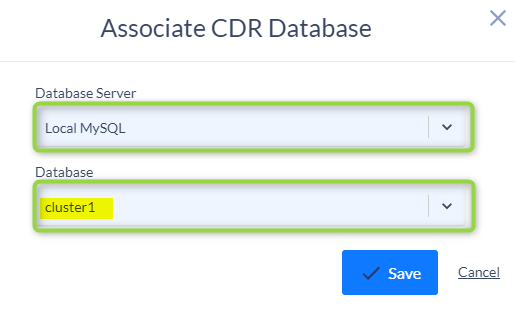
- Click Save.
You will now see your previous primary database listed as the Archive database and your new database will be the primary.