Variphy can collect various log files and processed CDR files that can fill up your available disk space over time. While we do have some cleanup tools to address the most common scenarios, some files may need to be cleaned up manually. The following are our recommendations for configuring disk space cleanup within the Variphy application, as well as steps on how to manually delete files in order to free up space.
In addition, you could simply add space to the drive if on a windows VM, however for our Linux OVA there are additional steps involved for adding space to the drive, which can be viewed in the KB article How to Increase Disk Space in Variphy Insight Virtual Appliance.
For the purpose of this article, we’ll assume you would rather clean up old files on the drive to free up space, rather than add additional space. The most common files used by Variphy that can take up a lot of disk space over time are Snapshots, Log Analysis files, and Processed CDR files.
Cleaning up Snapshots
Variphy Snapshots are typically stored in the following paths:
Windows: C:\Program Files\Variphy Insight\Snapshots
Linux OVA: \opt\variphy\apps\insight\snapshots
You can check the file size of the linux snapshots folder from the root of the insight folder with the command: du snapshots -sh
You can view if there are any Snapshots from the Change Management and Reporting feature. Make sure to check all available clusters via the drop down menu on the upper left, as some clusters may have been collecting snapshots without cleaning them up for a while if no clean up job was configured.
Existing snapshots can be deleted by individual selection, or all can be deleted by checking the top box on the left and choosing delete selected.
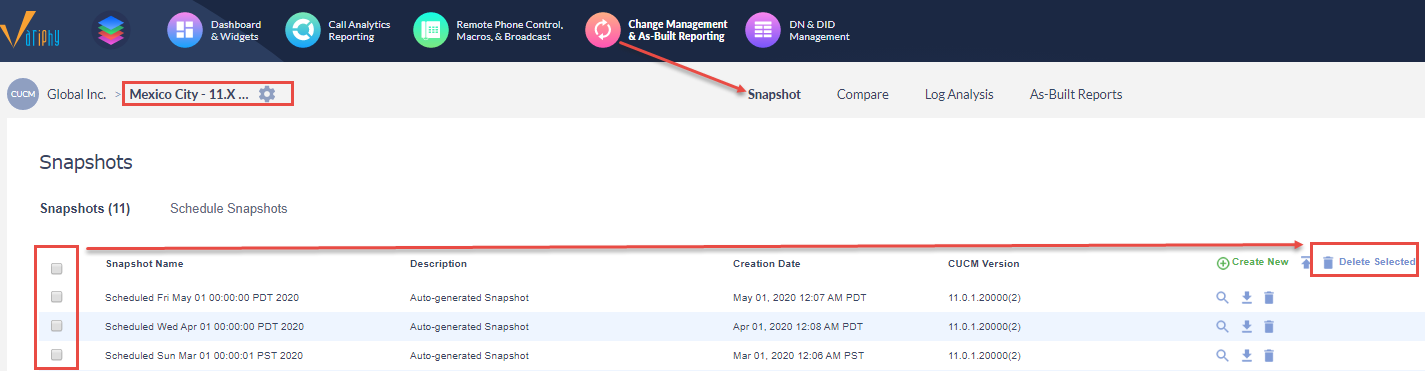
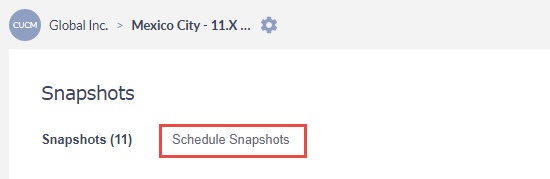
Select the Scheduled Snapshots tab to create schedules, view or edit existing schedules, set them to enabled or disabled, and most importantly, to set a cleanup schedule.

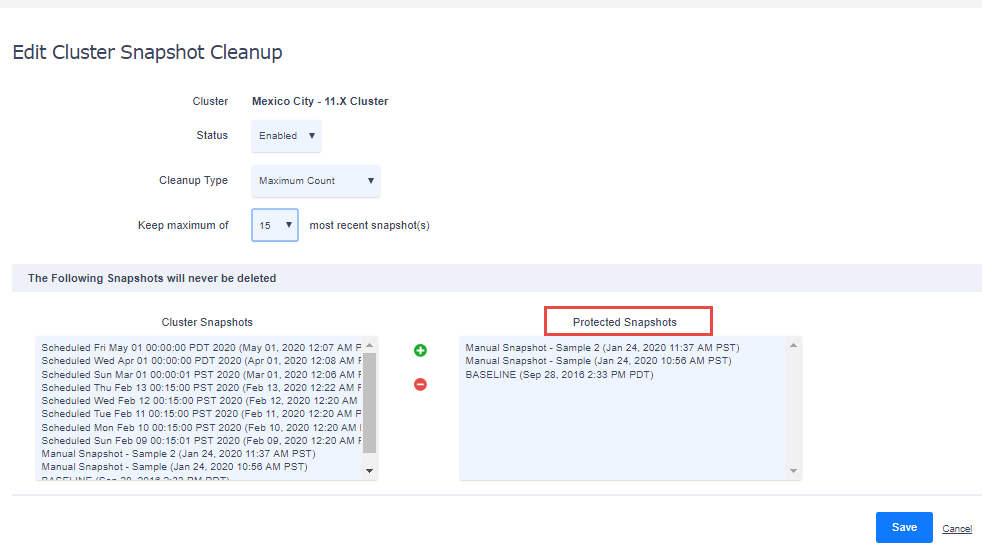
Here, you can set the maximum number of days or snapshots to keep. You may also move specific snapshots into the Protected Snapshots list, which will exclude them from deletion. All other snapshots not in the list will be deleted after the set retention period (e.g. 15 snapshots)

Please note that deleting snapshot folders manually from the Snapshots folder under the Variphy Insight path should only be done in the event that you see files in the folder but do NOT see any snapshots listed under any of the clusters. If you see the snapshots listed in Variphy, please delete them from the UI, as this will delete both the internal database pointers AND the actual files on the hard drive.
Cleaning up Log Analysis files
Log Analysis is a feature where we schedule Cisco’s change management logs to download from CUCM to Variphy via a daily scheduled FTP transfer from the RTMT (Real Time Management Tool) to the Variphy server. If not managed, these logs can eventually fill up the hard drive as they tend to get quite large over time.
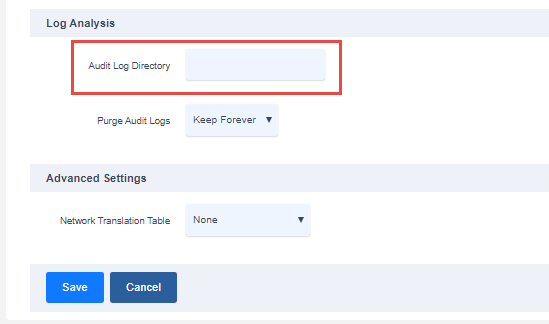
If you see the error below, then it means that this feature was never fully configured and you likely have no Log Analysis files on your Variphy server.
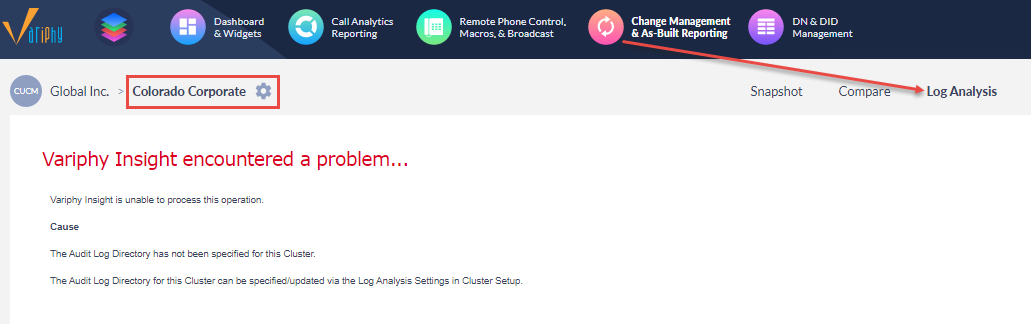
You can also check the cluster properties to confirm that the feature was not configured. You will see that there is no path defined for the snapshot storage. If there is a path defined, then you should always set a retention period with the drop-down box below (we typically recommend 1-3 months) so that Variphy can automatically delete older snapshot files and free up disk space.
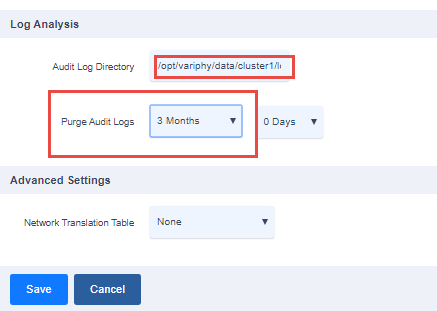
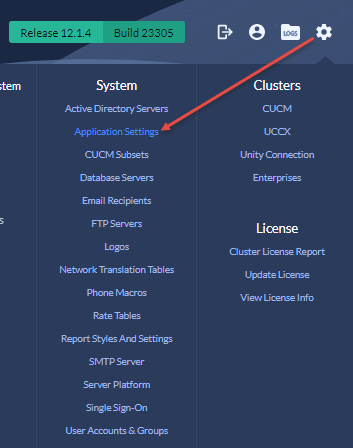
Once you have a retention period set in all of your clusters that have an Audit Log Directory defined, you can tell Variphy to purge any older Audit Log files immediately from the System > application settings menu
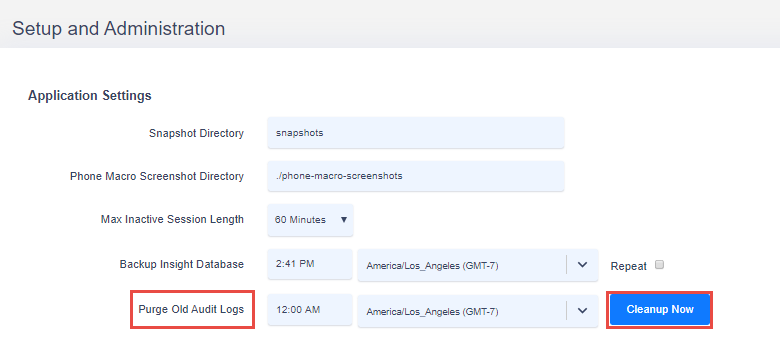
You can use the Cleanup Now option to automatically delete any Audit Log files older than the current retention period. You may also adjust the time that the daily Audit Log cleanup job runs (default midnight)
You Can also choose to just manually delete all Audit Log files if you are critically short on space. These will be found in the path specified in the cluster properties page as shown above. In the Linux OVA, you can delete the files with the commands:
cd /opt/variphy/data/cluster1/logs
(from the root of the logs folder): sudo rm * -rf
This will delete all the log folders and files recursively in that folder. Make sure to repeat for any other clusters by modifying the first line to show /cluster2/logs, cluster3/logs, etc. Unlike with the snapshots, the log files do not need to be deleted from the UI, as they do not use database pointers like the Snapshot files do. Once they are deleted manually from the logs folder(s), they will no longer appear in the Variphy UI.
Cleaning up processed CDR files
The one file type that Variphy will not manually clean up is processed CDR files, which are the raw files we received from CUCM and have processed to our database, at which point they are usually moved to a processed folder within the FTP repository. Currently, these files need to be manually deleted. Typically the only reason you might want to keep these files around is if you are keeping 1 years worth of calls (for example) and have processed CDR records going back 2-3 years (or longer). If you ever had a need to run a report on calls going that far back, you would need to process those files to another CDR database in order to be able to search the records. CUCM will only keep about 2 months of call data internally, so the processed folder is your only option for recovering older files outside of the set retention period.
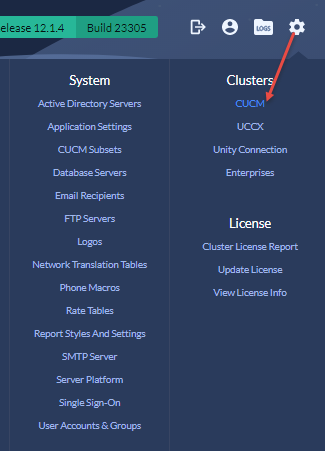
To see what your current retention period is for a cluster, go to Settings > Clusters > CUCM and edit the cluster properties
Under the Data Size Management/Purge Settings section you will see how long it is set to keep files in the database before purging them out. In this example, we are keeping regular CDR data for 6 months, off-hook abandoned call data for one month, and call quality records (CMR data) for 1 month, with a nightly 2 hour database cleanup job running at Midnight by default.

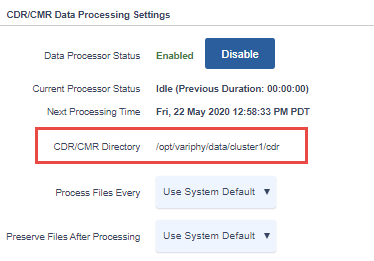
If you scroll back up toward the top of the properties page, you can view where the CDR/CMR data is stored on the server under CDR/CMR Data Processing Settings
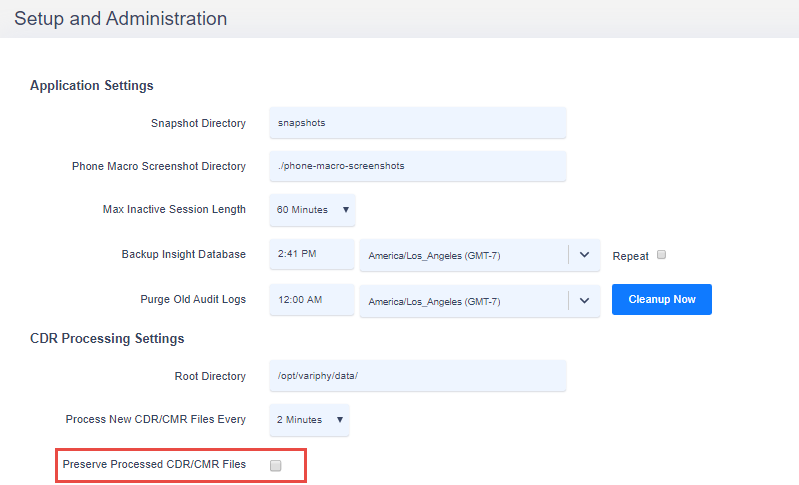
You will also see an option to Preserve Files After Processing. This determines whether the processed files are stored in a sub-folder of the CDR directory, or simply deleted after they are added to the database. If you want to override the system default (typically enabled to preserve files), you can set the Preserve Files After Processing to Disabled.
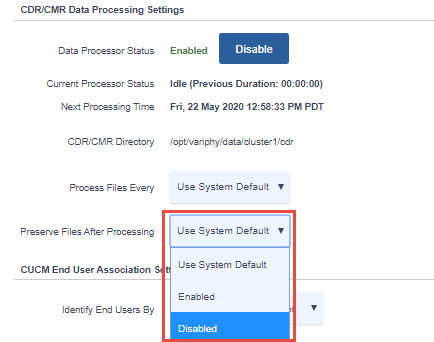
This will prevent Variphy from preserving any more processed CDR files. You can also un-check the option for the system default in Settings > Applications settings with the checkbox for Preserve Processed CDR/CMR Files left un-selected.
Any files in the Processed sub-folder of the CDR folder can be manually deleted. You can either delete all of them, or select the oldest ones to be deleted. In the Linux OVA, the easiest way to do this is with the rm command and wildcards. For example, say you go to the CDR folder and see that you have folders going back to 2015. You want to keep the 2019 – 2020 folders but delete the older ones.
You can view the list of processed folders for each cluster by going to the appropriate path and using the ls command (list):
cd /opt/variphy/data/cluster1/cdr/processed
ls (to view contents. They will be listed as daily folders in the format of the month’s 3 letter abbreviation, the day, and the year, e.g. Oct-15-2019)
If you see folders spanning multiple years, you can delete each year using the rf command with wildcards. so if you want to delete the years 2015 through 2018, you would run the following from the root of the processed folder/
sudo -s (to get into admin mode. This will prompt for the variphyadmin password, which is V@riphy!! by default)
rm *-2015 -rf
rm *-2016 -rf
rm * 2017 -rf
rm *2018 -rf
These will recursively remove the folders and their files for those years and likely free up a significant amount of space.
Setting a disk space alert in Variphy
We would highly recommend setting up a disk monitoring alert in Variphy that will notify you if the available space is getting below a certain threshold. This can be set in Settings > application settings > Hard Disk Space Mangement. Here, you can set a default available disk space threshold (in GB), as well as individual drive/partition disk space thresholds. Once the thresholds are set (we usually recommend between 2-5GB) you can select the email recipients of who you want to recieve the alerts from the selection box on the left below
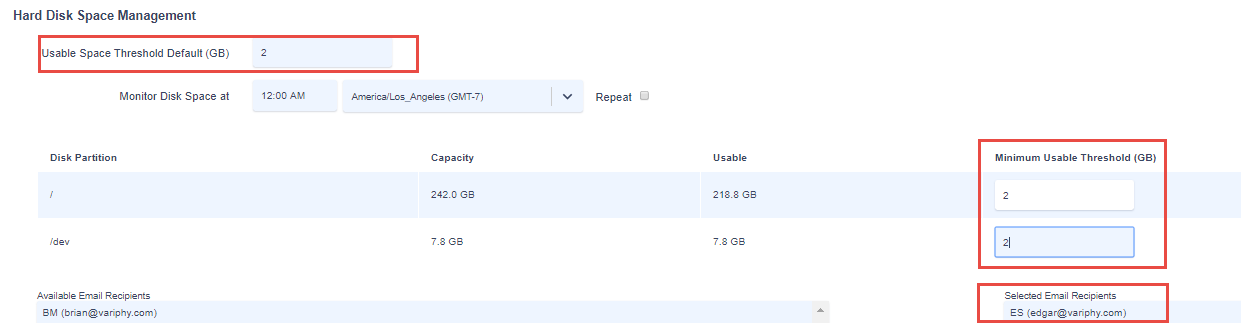
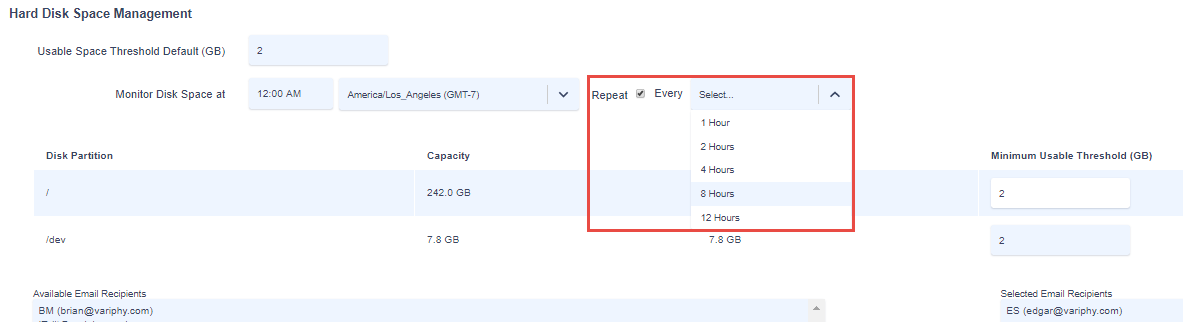
By default, it will check the disk space once per day at midinigh. If there is less usable disk space than the Threshold, an email alert will be sent, and continue to be sent at every check until the disk space issue is resolved. If you want it to check more often than every 24 hours, you can select the repeat checkbox with options to check every additional hour to 12 hours per day.
You will need to have an SMTP server and your email recipients configured ahead of time in order for this alert to function. If this part has not been set up yet, please see instructions in our KB article How to Configure SMTP Server in Variphy for Email Delivery
If you have any additional questions or would like some assistance with either cleaning up existing disk space or adding new space to the drive, please contact Variphy support team at support@variphy.com and we will reach out to you to schedule a webex session. Please note that our normal support hours are M-F 7:00 a.m. to 5:00 p.m. Pacific Time, with after hours/weekend support available if arranged in advance (additional fees may apply)