Starting in Variphy version 12.3 we now have the ability to process and archive calling data from Cisco Unified Border Element (CUBE).
CUBE Overview
Processing data supplied from CUBE supplies a more holistic view of an organization’s PSTN calling. It is possible for CUBE to not route calls destined to a CUCM Cluster. It is very possible to have CUBE route calls to a 3rd party application such as a Fax Server or IVR system. This gives us visibility into calls that CUCM would never see. The only calls CUCM see involving CUBE are when that PSTN call is sourced by or destined to a registered endpoint (phone, CCX port, Unity).
To the contrary, CUBE will only see PSTN facing call activity. It will not include CUCM intra-cluster call records.
CUBE Requirements
- Variphy 12.3+ with license allowing CUBE data processing
- Cisco IOS Release 12.4(20)T or a later release
- Cisco IOS XE Release 16.3.1 or a later release
https://www.cisco.com/c/en/us/td/docs/ios/voice/cdr/developer/manual/cdrdev/cdrcsv.html#77056
Variphy Server Requirements for CUBE
One thing to note about CUBE data is that multiple event records are logged for each call routing via a CUBE device. For instance each normal Two Way Call will have at least 2 events uniquely identified by the h323 Call Origin (Answer, Originate, or Call Back).
Knowing that each call is logged with numerous events, below are the bench mark stats pulled from a sample data set. Below represents the general specifications based on 650,000 events stored in the Variphy database.
| Description | Sample Amount | Requirement |
| Database Storage | 650,000 Events | 1GB |
| DB Memory (Separate) | 1:1 of Database Storage Requirement | 1 GB |
| Variphy Memory (Co-Res) | 1:1 of Database Storage Requirement + 8GB | 9GB |
| CPU | 2 vCPU |
| Description | Sample Amount | Requirement |
| Database Storage | 8,000,000 Events (8M / 650,000) | 12.3 GB |
| DB Memory (Separate) | 1:1 of Database Storage Requirement | 12.3 GB |
| Variphy Memory (Co-Res) | 1:1 of Database Storage Requirement + 8GB | 20.3 GB |
| CPU | 2 vCPU |
Enable FTP on Variphy OVA
Requirements
The following high level items are required to enable FTP access for CUBE
- Variphy application running as variphyapp with directory permissions into the CDR Directories configured correctly by existing scripts
- FTP Server installed, configured/locked down, and enabled. (vsftpd). See below for setup
- FTP User accounts created. New OVA’s will have a default variphyftp user account, but upgraded installations will need to create this account. See “Upgrading an Existing Installation” below
- The FTP User account information will need to be configured in each of the CUBE devices
- The Customer’s network will need to allow FTP access from their CUBE devices to the Variphy server
New 12.3 OVA Setup
The OVA comes with FTP preinstalled but disabled by default.
- Build out your CUBE device in Variphy UI
- To enable FTP on Variphy server CLI run command :
enable-ftp - Once FTP is enabled it is accessible to authorized users only. By default there is a variphyftp account created with the password V@riphy!! which can be used. This account does not have shell access, and can only upload files into the CDR Data directory.
- There is also a command line alias add-ftp-user which can be used to create additional FTP-Only users. The script can be called without providing any options and will prompt for the Username and Password. These can also be provided as command line options as shown below. The CDR Data directory option can be used to provide a non-standard location for the CDR Data to be stored (the ftp user will have access to upload files here, but the variphyapp account must have access to these non-standard directories as well for processing to work)
Example:add-ftp-user -n USERNAME -p PASSWORD -d CDR_DATA_DIRECTORY
Upgrading an Existing OVA Installation (Prior to 12.3)
After upgrading the Variphy application to a version > 12.3 (which introduces CUBE), and applying your new license to allow CUBE features, the following steps will need to be performed in order to enable FTP access, create the appropriate user accounts, and create the necessary folder directories.
- Install vsftpd
$INSTALL_DIR/scripts/install-vsftpd.sh
cd /opt/variphy/apps/insight/scripts
sudo sh install-vsftpd.sh
- Run a script to create a new variphyapp account and update the variphy service to be run by this account instead of by variphyadmin
$INSTALL_DIR/scripts/security/service-ownership/update-variphy-service-ownership.sh
cd /opt/variphy/apps/insight/scripts/security/service-ownership
sudo sh update-variphy-service-ownership.sh
- Variphy services will restart. At this time browse/refresh your Variphy web session and begin your CUBE/IOS device configuration (outlined below in the Variphy CUBE/IOS Setup section).
- In the CDR File Directory defined will automatically be created with the permissions of ‘variphyapp’ set above.
- **Important** – Build out your CUBE device in Variphy UI (Settings > Cluster > CUBE/IOS). Upon cluster activation the application will auto-create the directory folder with correct permissions, to be used for FTP User in next step.
- Create at least one FTP-Only User account to be used by the CUBE(S) to send the Call Data to the Variphy server. The script below can be run with or without the command line arguments.
- If the Username and Password are not provided as command line arguments the script will prompt for them.
- If the directory is not provided as command line argument, it will use default of /opt/variphy/apps/insight/CDR/ to place your CUBE device data.
Example creating the standard default ftp account:$INSTALL_DIR/scripts/create-ftp-user.sh -n variphyftp -p 'Variphy!!' -d /opt/variphy/data/folder_name
cd /opt/variphy/apps/insight/scripts
sudo ./create-ftp-user.sh -n variphyftp -p 'Variphy!!' -d /opt/variphy/data/folder_name
NOTE – Refrain from using the ‘@’ symbol in any aspect of user accounts or passwords as CUBE will take that as an end to the connection string and a delimiter for the FTP destination .
NOTE – Ideally you will want a unique user created for each defined CUBE device directory folder.
In some cases you may need to change the home directory of an FTP user.
Example changing home directory to the default ftp account: sudo usermod --home /opt/variphy/data/folder_name variphyftp
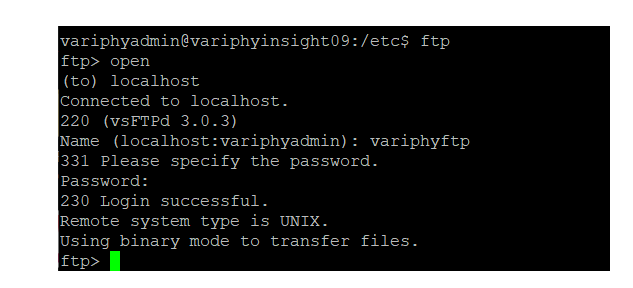
Test FTP connectivity in Linux
After completing the FTP user setup you will need to test the FTP account both locally from the Variphy server using the below CLI commands and remotely using a FTP client like WinsSCP, FileZilla or another FTP client utility.
- Test FTP locally in Linux
Enter ftp in the command line
ftp> open
(to) localhost
Name (localhost:variphyadmin): variphyftp (if using something other than the default please specific the ftp user you created)
Password: Variphy!! (If using a different password please specify the password you created)
230 Login successful
ftp> quit (to exit ftp)
CUBE Configurations
NOTE: IOS version 17.9.4a has changed encryption level. You will need to specify a password level of 0 prior to entering the password. Please utilize the proper commands for your IOS version.
IOS versions below 17.9.4a
| Command | Description |
| Router # enable | Enables privileged EXEC mode |
| Router # configure terminal | Enters Global Config mode |
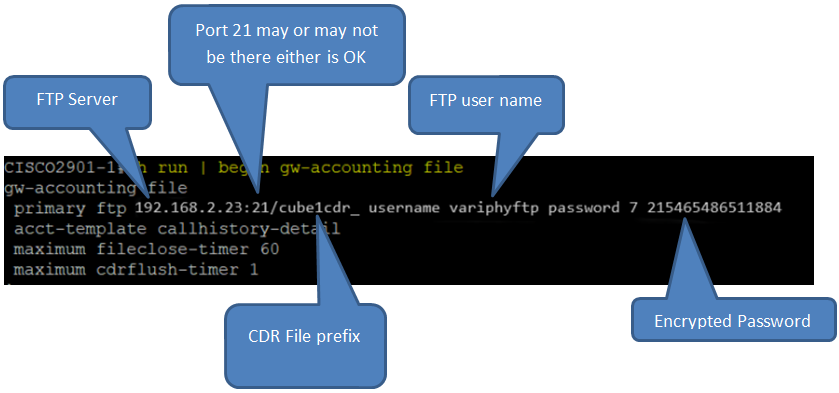
| Router(config)# gw-accounting file | Enables File Accounting method |
| primary/secondary { ftp path/filename username username password password | ifs device : filename } ——————- Router(config-gw-accounting-file)# primary ftp 10.20.30.146/cdr username variphyftp password Variphy!! | Primary FTP Source and file prefix to be used. Username and Password of root folder FTP account |
| maximum cdrflush-timer minutes ——————- Router(config-gw-accounting-file)# maximum cdrflush-timer 55 | Set the maximum time to hold records in buffer before appending records to file. 1-1435 Default 60 |
| maximum fileclose-timer minutes ——————- Router(config-gw-accounting-file)# maximum fileclose-timer 60 | Set the maximum time for writing records to file before closing it and create a new file. 60-1440 Default 1440 |
| cdr-format { compact | detailed } ——————- Router(config-gw-accounting-file)# cdr-format detailed | Selects the detailed format for file accounting. Supplies full set of voice attributes |
| acct-template { template-name | callhistory-detail } ——————- Router(config-gw-accounting-file)# acct-template callhistory-detail | Collects all voice VSA (Vendor Specific Attributes) for accounting |
| Router(config-gw-accounting-file)# end | End gw-accounting file and configuration mode. |
| Router# wr mem | Write Memory and Saves config |
IOS versions 17.9.4a and greater
| Command | Description |
| Router # enable | Enables privileged EXEC mode |
| Router # configure terminal | Enters Global Config mode |
| Router # key config-key password-encrypt Variphy!! | Command to configure and enable the password (symmetric cipher AES is used to encrypt the keys). |
| Router # password encryption aes | Command is the master encryption key that is used to encrypt all other keys in the router. |
| Router(config)# gw-accounting file | Enables File Accounting method |
| primary/secondary { ftp path/filename username username password password | ifs device : filename } ——————- Router(config-gw-accounting-file)# primary ftp 10.20.30.146/cdr username variphyftp password 0 Variphy!! | Primary FTP Source and file prefix to be used. Username and Password of root folder FTP account. IOS version 17.9.4a, you will need to specify a password level of 0 prior to entering the password, which will allow it to accept a plaintext password when building the gw-accounting file. Once the file has been written, if you do a read of the gw-accounting file the password will show an encryption level of 6 followed by an encrypted value, as it will take the plaintext password you entered and encrypt it afterward, e.g.: |
| maximum cdrflush-timer minutes ——————- Router(config-gw-accounting-file)# maximum cdrflush-timer 55 | Set the maximum time to hold records in buffer before appending records to file. 1-1435 Default 60 |
| maximum fileclose-timer minutes ——————- Router(config-gw-accounting-file)# maximum fileclose-timer 60 | Set the maximum time for writing records to file before closing it and create a new file. 60-1440 Default 1440 |
| cdr-format { compact | detailed } ——————- Router(config-gw-accounting-file)# cdr-format detailed | Selects the detailed format for file accounting. Supplies full set of voice attributes |
| acct-template { template-name | callhistory-detail } ——————- Router(config-gw-accounting-file)# acct-template callhistory-detail | Collects all voice VSA (Vendor Specific Attributes) for accounting |
| Router(config-gw-accounting-file)# end | End gw-accounting file and configuration mode. |
| Router# wr mem | Write Memory and Saves config |
Optional CUBE Configurations
| secondary { ftp path/filename username username password password | ifs device : filename } ——————- Router(config-gw-accounting-file)# secondary ifs flash:cdrtest2 | Optional – secondary source for data delivery to FTP or Flash Memory.. Example using Flash Memory on this router. |
| maximum retry-count number ——————- Router(config-gw-accounting-file)# maximum retry-count 3 | Optional – Max connect attempts before switching to secondary delivery. 1-5 Default 2 |
| maximum buffer-size kbytes ——————- Router(config-gw-accounting-file)# maximum buffer-size 20 | Optional – Set the maximum size of the buffer. 6-40Kb Default 20. This will act in addtion to the maximum cdrflush-timer setting applied. |
Variphy CUBE/IOS Setup
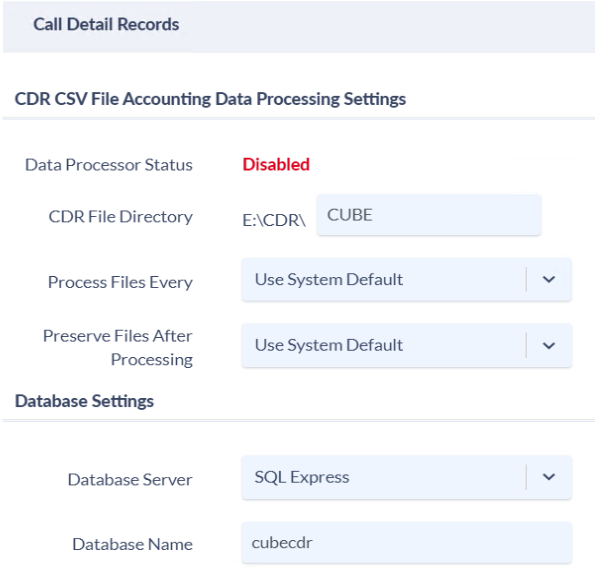
After upgrade to Variphy 12.3 and license is coded to allow CUBE devices, user will see a new CUBE/IOS Cluster type.
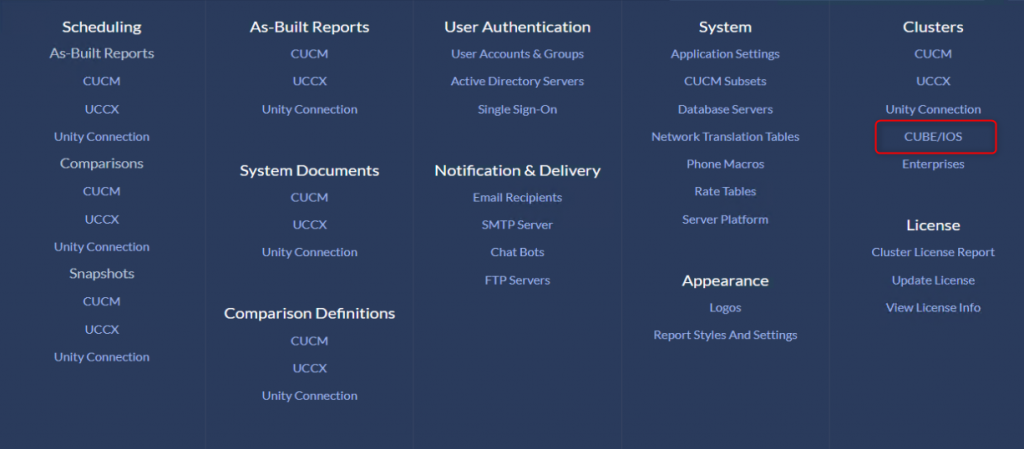
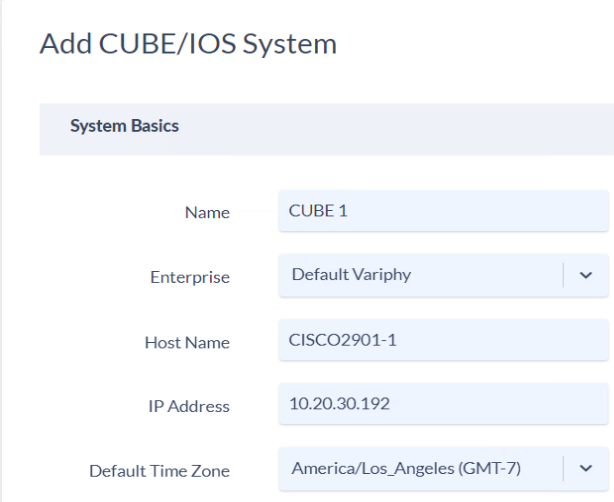
Click the Add New button
Name – Description of CUBE
Enterprise – Select the default or named Enterprise you’d like to associate this CUBE device to.
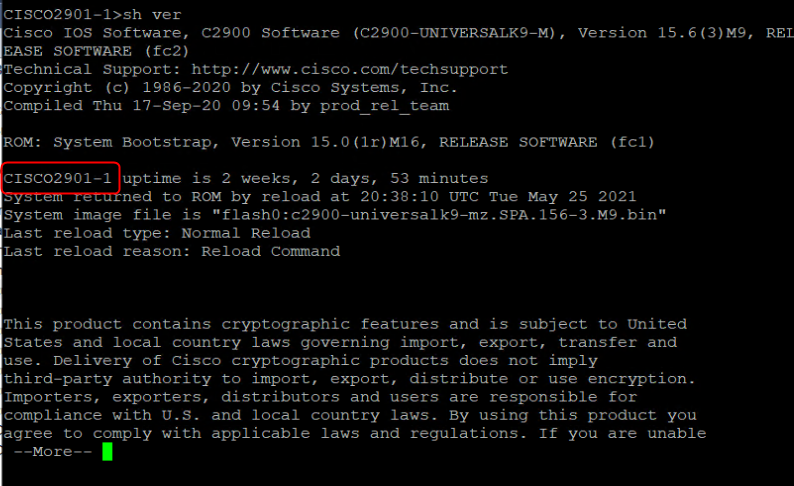
Host Name – This must match the output of sh version on the CUBE device
IP Address – IP Address of CUBE. We will use this for informational purposes only, at this time.
Default Time Zone – Select the time zone that this CUBE device resides in.
Data Processor Status – Current Status of data processing. This will remain Disabled until the CUBE cluster type is Activated and database created.
CDR File Delivery – The subfolder name within the root directory in which you are FTP’ing data to. For Linux this will likely read /opt/variphy/data/CUBE/.
Process Files Every – Use System Default refers to global setting defined in Settings > System > Application Settings
Preserve Files After Processing – Use System Default refers to global setting defined in Settings > System > Application Settings
Database Server – Select the predefined Database Server defined on Settings > System > Database Servers
NOTE * Using the Variphy OVA will default this setting to the local database engine.
Database Name – Indicate a unique database name that will be created to hold your CUBE data. Initial setup will create the database and write the schema to the selected database server with this supplied name.
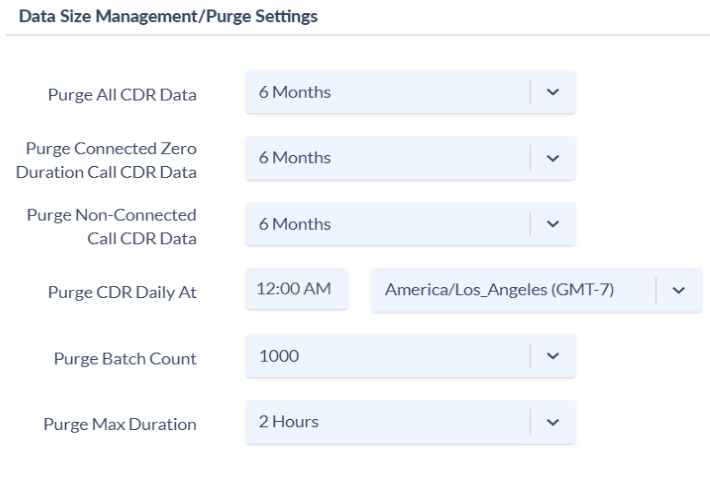
Purge All CDR Data – The amount of CUBE data to retain in the database before a nightly purge takes place.
Purge Connected Zero Duration Call CDR Data – Ability to delete CUBE data that is Connected but also 0 duration at a different pace vs. Non-Connected events.
Purge Non-Connected Call CDR Data – Ability to delete CUBE data that is Non-Connected at a different pace than Connected / 0 duration events.
Purge CDR Daily At – Time in which you’d like the purge cycle to run.
Purge Batch Count – Default 1000. Amount of records each delete statement handles.
Purge Max Duration – The allowed time to run the purge process. IE: It will run threads (LIMITS) of 1000 records for a duration of 2 hours daily until all necessary records are deleted.
Useful troubleshooting commands.
Variphy OVA (linux) Commands
To show all vsftpd users:
cat /etc/vsftpd.userlist
To validate that the firewall is disable:
sudo ufw status
To make sure vsftpd service will run after Linux restart:
sudo systemctl enable vsftpd.service
To Check the ftp user home directory. In the below example we are validating the variphyftp user home directory.
cat /etc/passwd | grep variphyftp
To change the ftp users home directory. In the below example we are changing the home directory for the variphyftp user to /opt/variphy/data/CUBEdata
sudo usermod --home /opt/variphy/data/CUBEdata variphyftp
To reset the vsftpd users password. In the below example we will change the ftp password of the variphyftp user.
sudo passwd variphyftp
To show the VSFTPD log file.
cat /var/log/vsftpd.log
CUBE commands
To show the files contained in flash.
show flash:
To show the File accounting configurations on the CUBE.
sh run | begin gw-accounting file
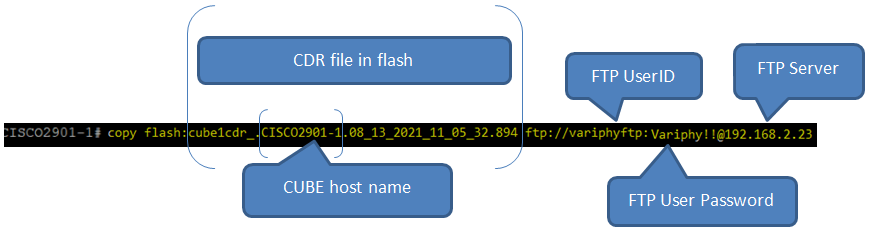
To manually ftp copy a file from flash
copy flash:filename ftp://userid:password@FTPServer
Force the File Accounting configurations to run now
file-acct flush with-close
Rest the File Accounting routine. Used when File accounting stops pushing data and needs to be restarted.
file-acct reset
Show Active CUBE Calls. Useful to see calls prior to forcing a push.
show isdn active