Applies to:
- System administrators
- Network administrator
- IT operations
Common Causes or Issues
When you need to run the Variphy web interface on a non-standard port like 443 for HTTPS or 80 for HTTP.
NOTE: The following process is approved for Variphy 15.4 and above. We strongly recommend updating the latest version prior to making the adjustments.
This process is designed around the Variphy OVA. If you are running Variphy under your own Linux Operating system, please consult your information technology group to assure these changes are compatible with your OS version.
How to Use Port 443 or 80 for the Variphy Web GUI
1. Log in to the Variphy Linux server.
Log in to the Variphy Linux server via an SSH connection (Putty, SecureCRT, etc.).
2. Browse to the directory.
Browse to this directory: cd /opt/variphy/apps/insight/config
3. Edit the port label to the desired port.
For Port 443
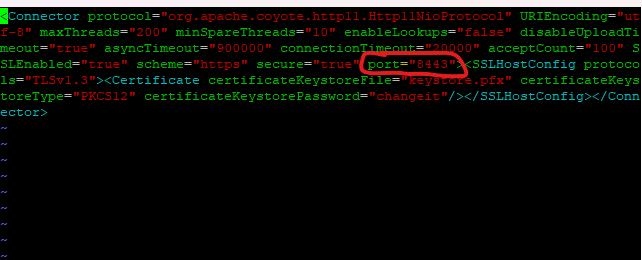
You will edit the file https_customizations.xml with a file editor:
- Execute the following command: Sudo vi https_customizations.xml
- Press the letter i key to enter edit mode.
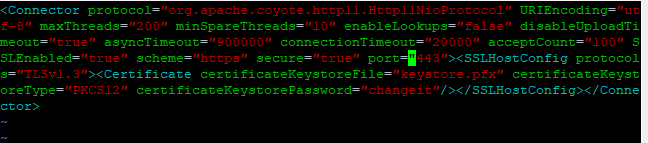
- Use your right arrow key and move over to part of the file config labeled port=”8443″>
- Change the port from 8443 to 443
- Exit the editing mode by pressing the ESC button on your keyboard.
- Press the Shift/Enter key, then press the colon key, and type !wq — this will be displayed at the bottom of the session.
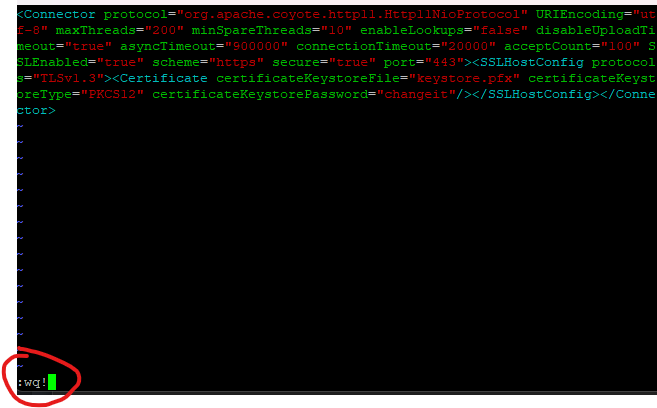
- Press Enter to save the file.
For Port 80
You will edit the file http_customizations.xml with a file editor.
- Execute the following command: Sudo vi http_customizations.xml
- Press the letter i key to enter edit mode.
- Use your right arrow key and move over to part of the file config labeled port=”8080″>

- Change the port from 8080 to 80

- Exit editing mode by pressing the ESC button on your keyboard.
- Press the Shift/Enter key, then the colon key, and type !wq — this will be displayed at the bottom of the session.

- Press Enter to save the file.
4. Allow access to the port.
You will run commands to allow privileged ports to be accessed (under port 1024).
- Stop the Variphy service: sudo systemctl stop variphy.service
- Run the setcap command: sudo setcap CAP_NET_BIND_SERVICE=+eip /opt/variphy/apps/insight/jre/bin/java
- Run the echo command: echo “/opt/variphy/apps/insight/jre/lib” | sudo tee /etc/ld.so.conf.d/VariphyJava.conf
- Run the ldconfig: sudo ldconfig -v
- Run the command to start the Variphy service: sudo systemctl start variphy.service
Browse to your GUI to confirm that the newly configured port is working.
Reminder: Running the service-ownership script (update-variphy-service-ownership.sh will break UI access. The commands in step 4 would need to be run again to resolve the connection.
Still Need Help?
Email our support team at support@variphy.com or click the button below to access our ticket portal.
Please provide details about your question or issue, including any applicable screenshots, reports, or Variphy application log files.