Applies to:
- System administrators.
- IT administrators.
- Network administrators.
Common Causes or Issues
If you are low on available disk space or need more disk space for data retention, we recommend adding a new disk rather than increasing the size of the existing disk. For more information on how to add a new disk in the Variphy Insight Virtual Appliance (OVA), please refer to How to Increase Disk Space in Variphy Insight Virtual Appliance by adding a new disk.
If you wish to increase the existing disk rather than add a new disk, this guide will walk you through making the necessary changes within the Ubuntu operating system to allow the Logical Volume to recognize the increase in disk size.
How to increase the size of an existing disk in the Variphy Virtual Appliance
1. Log in to the Variphy OVA operating system.
2. Switch to become the root user.
Run the command sudo su - to switch to a substitute user to become the root user.
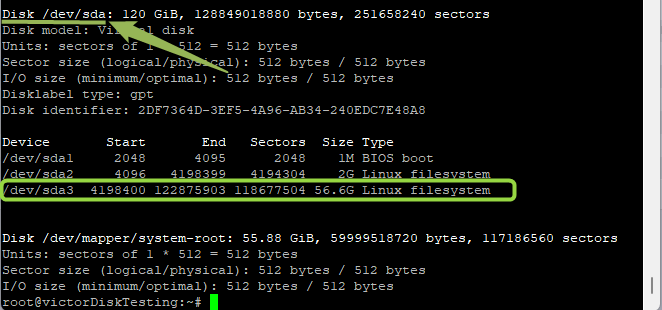
3. Display the partitions.
Run the command fdisk -l (a lower case L, not the number one).
The disk /dev/sda displays the total volume of the disk.
In this example, /dev/sda3 matches the number 3 partition on the SDA disk that I am expanding.
4. Rescan the block device to detect the size change.
a. To rescan the block device to detect the size change, run the echo 1 > /sys/block/sda/device/rescan command.
The SDA is from Step 3.a without the /dev/ part. fdisk -l will show the updated disk size.
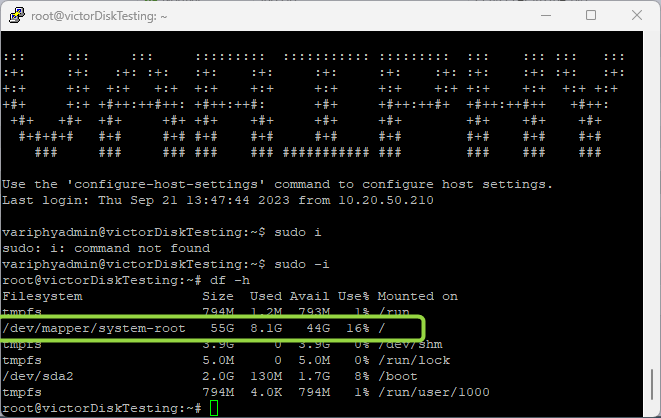
b. Run the command df -h to display the disk size in a readable format.
5. Copy the file system path.
a. Copy the file system path.
In this example, /dev/mapper/system-root is the path.
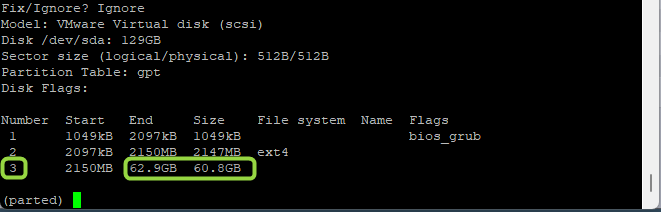
b. Run the parted /dev/sda command.

c. Type print and press enter.
d. When a warning message is displayed, type Fix and then press enter.

6. Specify the size of the new partition.
a. Note the number for the partition to resize.
In this example, the file system partition is number 3, which I can tell due to the size on the disk.
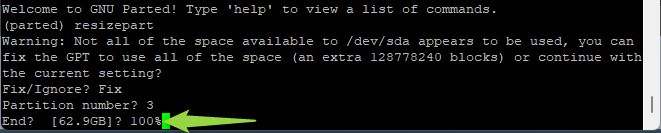
b. Run the resizepart command.
c. Another warning MAY be displayed. Type Fix and then press enter. If another warning is not displayed, enter your partition as requested in the UI.
d. Enter your partition number from step 6.a.
In this example, the partition number is 3.

e. When it asks for the percentage of the size of the new partition, type 100% and press enter.
f. Type quit and press enter.

7. Resize the LVM physical volume.
a. To resize the LVM physical volume (PV), run the command pvresize /dev/sda3 (/dev/sda3 comes from Step 3.a).
b. Run lvextend -l +100%FREE /dev/mapper/system-root
NOTE: This is the path to your file system from Step 5.a.

c. Run resize2fs /dev/mapper/system-root
NOTE: This is the path to your file system from Step 5.a.

d. Type df -h and press enter.
Still Need Help?
Email our support team at support@variphy.com or click the button below to access our ticket portal.
Please provide details about your question or issue, including any applicable screenshots, reports, or Variphy application log files.