In Variphy, user accounts can be created as internal standalone logins, or can be linked to a user’s Active Directory account. Likewise, permissions can be granted on an individual or group level. Variphy’s granular permissions configuration menu allows you to give the end users as much or little access as they require, and can be restricted to specific clusters, dashboards, reports, or call data ranges.
Of course, the first thing to ask is “Does the user need their own login to the application?” Data can easily be shared via scheduled reports emailed directly to the users, or with dashboard permalinks that will allow the users to pull up dashboard views without ever having to log into the application. In most cases, this will be the preferred method to share data with users. However, some power users may need the ability to run or adjust reports and dashboards on the fly, so these can be given a login with additional access.
Using an internal Variphy account (or standalone account) requires no outside authentication, and simply requires creating a username and password, then setting levels of access. Using Active Directory accounts, on the other hand, requires that an AD server be linked to Variphy prior to creating the accounts. If and AD server has not yet been linked, please see our knowledge base article to complete this step.
When working with group permissions, it’s also important to note that all permissions are determined at the Variphy group level, with accounts (standalone or AD) being added to these groups. Active Directory groups may not be used for determining Variphy permissions at this time.
Adding user accounts
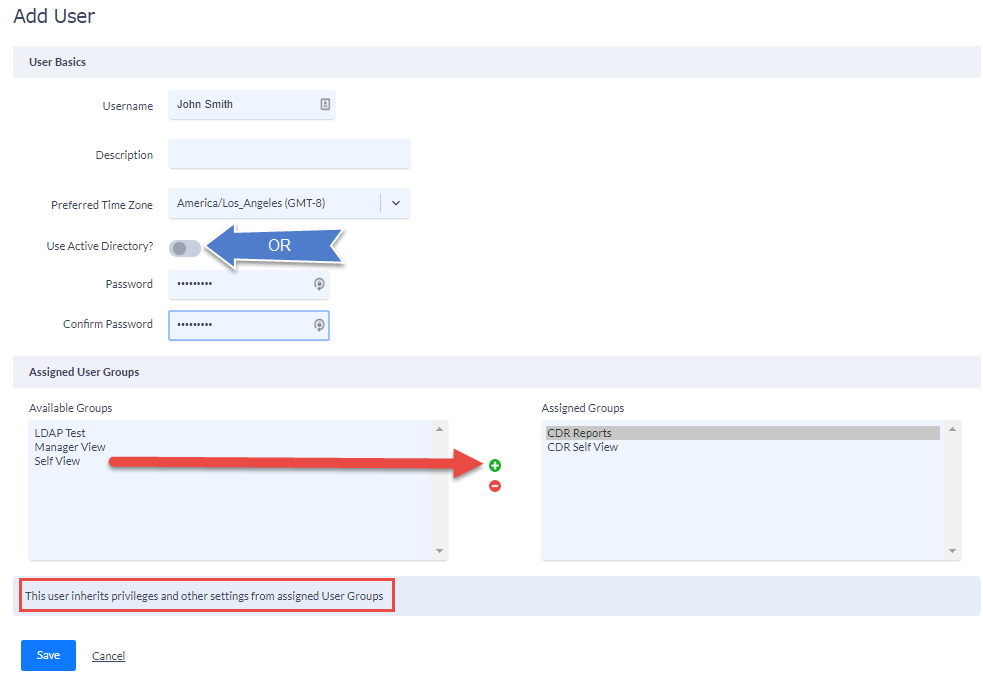
To add a user account, go to the Settings (gear icon) in Variphy and access User Accounts & Groups under the System category.

Click the Add button in the upper right corner to add a new user. If you are creating a standalone account, provide a user name and password manually. If creating an Active Directory account, toggle the setting (note the the password fields will be masked, as it will use the user’s AD login).
If you wish to add the user to any available groups, select the group from the left panel and move to the right. If more than one permissions group is added, the first group listed will take precedence. Save changes to enable the user account.
If you are not using group permissions, you’ll need to create the user’s permission level individually. Anyone managing the Variphy app should have full administrator permissions. Others can be given permissions based on their particular need, by feature, report, cluster, etc. You can also give users permissions to change their own password, change the time zone for their profile, Show a license warning (will be visible starting 90 days from expiration) or view variphy logs.
If the user is to have any level of dashboard access, the primary dashboard toggle will need to be enabled as well. Cluster access will then need to be enabled in the next section.
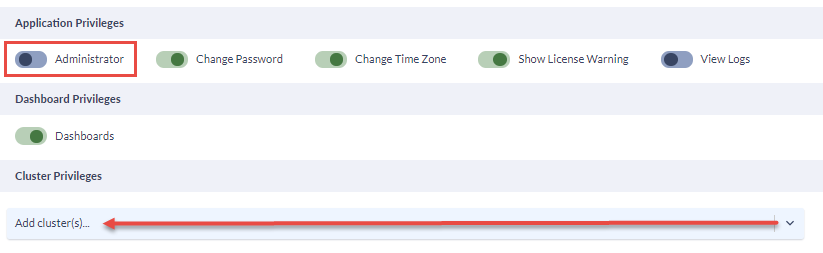
To add clusters, select the name in the drop down box, then click on the green plus sign to the right to add it. This will create a cluster box below with additional permission levels.
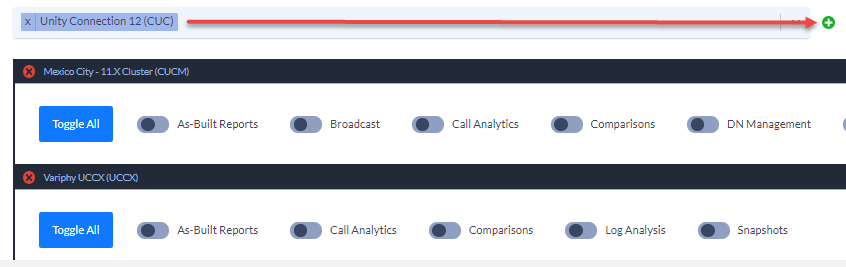
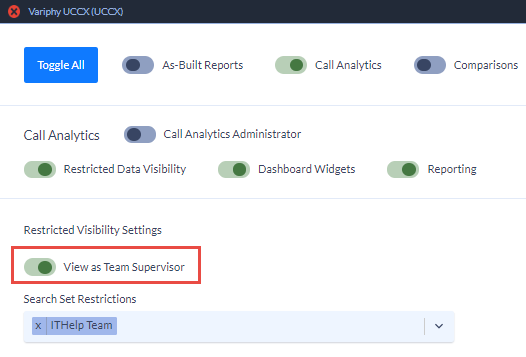
Toggle the sections the users will have access too. The Call Analytics toggle, will open up additional options. If Call Analytics Administrator is selected, they will have full access to the Call Analytics section only and can add, edit, create, delete, or schedule all reports. Otherwise they will only have the features that are toggled. Under the Reporting toggle, read, write, and full access to individual reports can be granted. The ability to schedule reports and view dashboards for CUCM and UCCX clusters can also be selected. Additionally, options for “ad-hoc” call history search and call accounting can be enable in CUCM clusters.
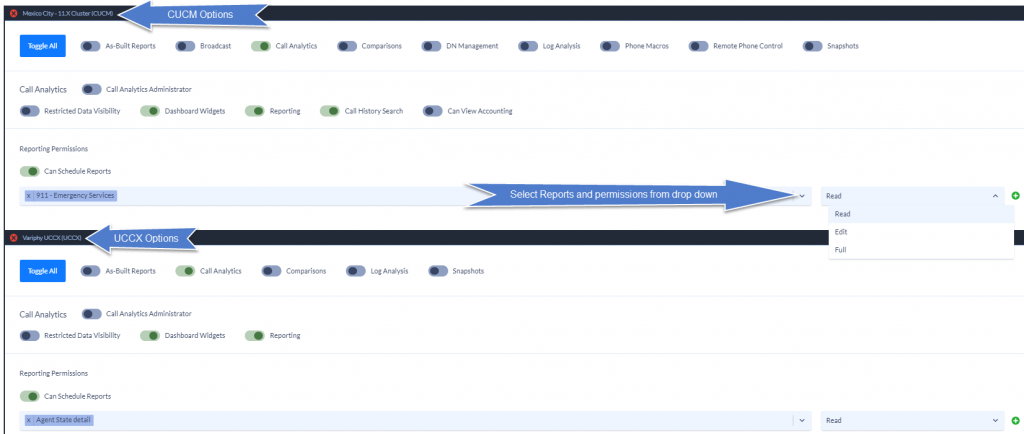
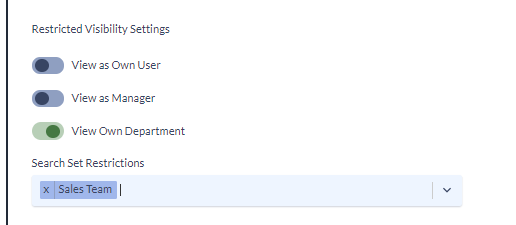
In addition to selecting feature access, you can also enable Restricted Visibility Settings. These will allow you to restrict the user from seeing call data outside of their own history, their department, or any custom data restriction search sets. These can be used to either limit data searches to specific ranges, or exclude specific ranges. In UCCX, you can toggle “View as Team Supervisor” and add the appropriate search set restrictions. These will be covered later in the document, after permission groups.
Under CUCM, you may grant the ability to View own user, Manager, or Department call data, or add a custom restriction.
Note that these permissions working correctly depends on all user info and department/manager associations being properly configured in CUCM and Active Directory (if CUCM is LDAP synced).
Creating Permission Groups in Variphy
Permissions can also be controlled at a group level within the Variphy application. Group permissions will override any individual permissions a user may have once they are added to the group.
Please note that while both standalone and AD users in Variphy can be added to a Variphy permissions group, Active Directory groups cannot be added to Variphy or be used to configure any permissions in Variphy.
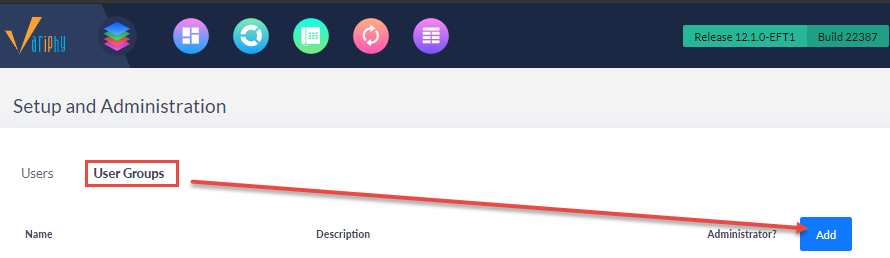
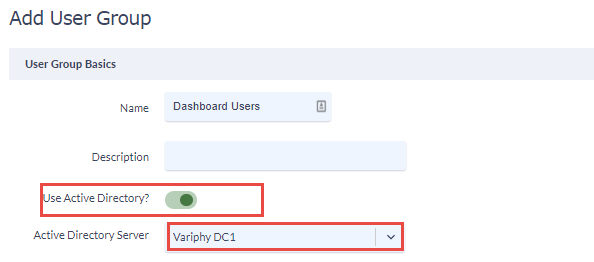
To create a permissions group, go to Settings, System, then User Accounts and Groups. The menu will default to the user list, so toggle the Groups tab. Click on the Add button to create a new group.
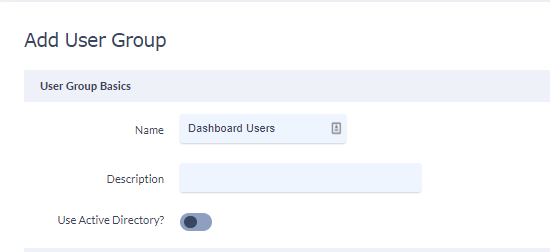
When creating the group, you will note that there is a Use Active Directory? toggle. This does not mean that an Active Directory group will be used for assigning permissions. This toggle is to be used for Variphy groups consisting of only Active Directory users that have been configured in Variphy. If you are not using AD users, leave this toggle off and only add standalone accounts to the group. If you are using AD accounts, toggle this on and select your AD server from the drop down box, and only add AD-linked accounts to the group. It is not possible at this time to do a “mixed” group of both standalone and AD users.
Next, add the desired users from the Available Users list to the Assigned Users list, using the green plus button. Multiple users can be selected at once with either SHIFT + Click for a contiguous list of users, or CTRL + Click to select non-contiguous users in the list.

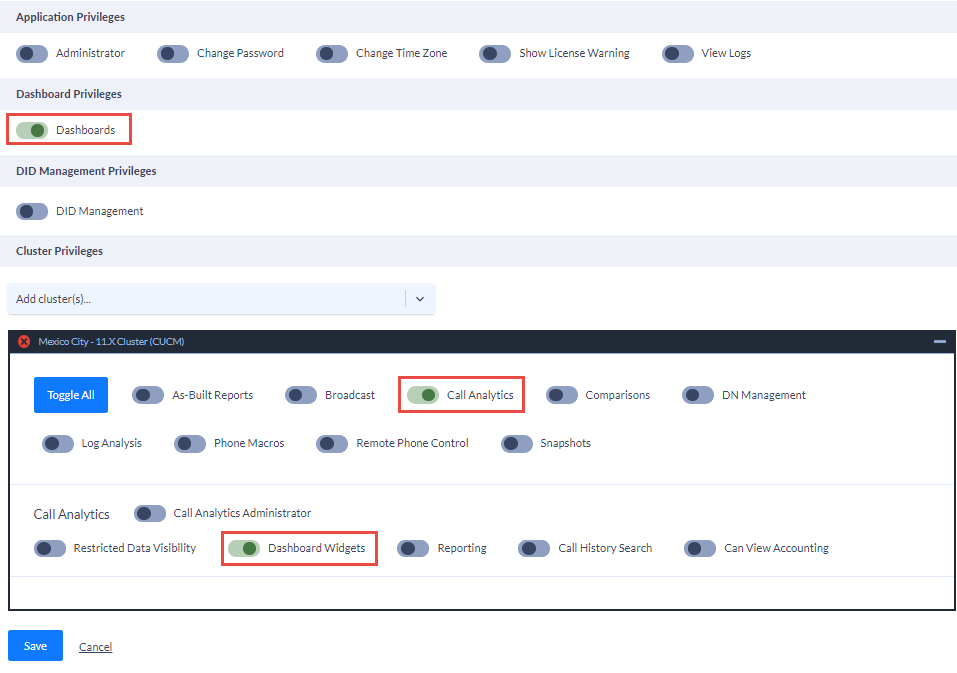
Finally, select the features and clusters you wish the group to have permissions to. These settings are the same as those that are available for individual user accounts. In this example we only want the users to access dashboards for a single cluster so we’ll enable call analytics and dashboard widgets on the specified cluster.
Again, once you add users to a group, the group permissions will override any individual permissions they have set on their account, even if they are an administrator, so be sure that your group permissions do not conflict with any other permissions they might need.
If you have any further questions, or would like some assistance with configuring user accounts, groups, or permissions in Variphy, please contact us at support@variphy.com and a ticket will automatically be added to our help desk queue. One of our software engineers will reach out to schedule a session with you as soon as possible. Please note that our normal support hours are M-F from 7:00-4:00 Pacific Time, excluding U.S. Holidays.